
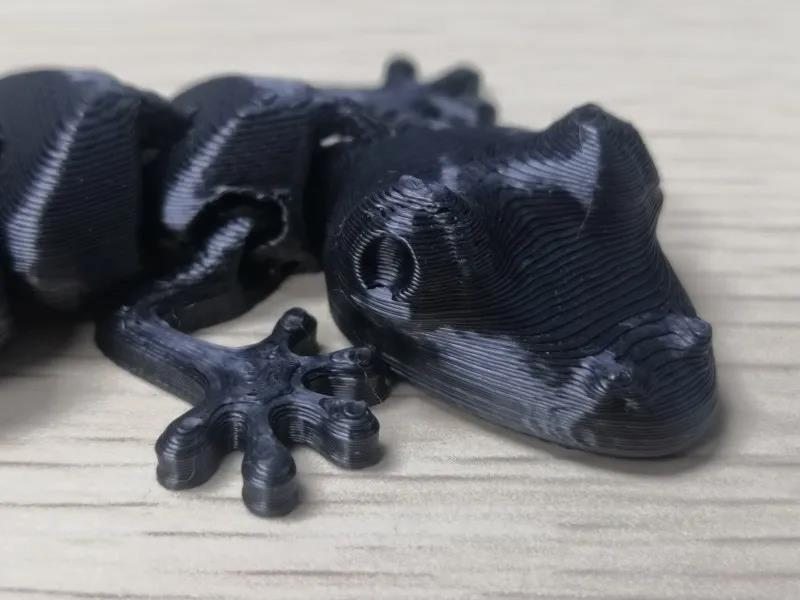
WHAT’S THE ISSUE?
Sometimes fine details are needed when printing a model. However, the print you got may not achieve the expected effect where should have a certain curve and softness, and the edges and corners look sharp and clear.
POSSIBLE CAUSES
∙ Layer Height Too Large
∙ Nozzle Size Too Large
∙ Printing Speed Too Fast
∙ Filament Not Flowing Smoothly
∙ Unlevel Print Bed
∙ Printer Losing Alignment
∙ Detail features too small
TROUBLESHOOTING TIPS
Layer Height Too Large
The Layer height is the most common cause of the low details shown. If you have set a higher layer height, the resolution of the model will be lower. And no matter what the quality of your printer is, you will not able to get a delicate print.
decrease the layer height
Increase the resolution by reducing the layer height (for example, set 0.1mm height) and the print can be smoother and finer. However, the printing time will increase exponentially.
Nozzle Size Too Large
Another obvious issue is nozzle size. The balance between nozzle size and printing quality is very delicate. General printer uses a 0.4mm nozzle. If the details part is 0.4mm or smaller, it may not be printed.
NOZZLE DIAMETER
The smaller the nozzle diameter, the higher detail you can print. However, smaller nozzle also means lower tolerance and your printer needs to be fine-tuned because any problem will be magnified. Also, smaller nozzle will require longer printing time.
Printing Speed Too Fast
Printing speed also has a great effect on the details printing. The higher the printing speed, the more unstable the printing, and the more likely to cause the lower details.
SLOW IT DOWN
When printing the details, the speed should be as slow as possible. It may also be necessary to adjust the fan speed to match the increasing time of the filament extrusion.
Filament Not Flowing Smoothly
If the filament isn’t extruded smoothly, it may also cause over-extrusion or under-extrusion when printing details and make details parts look rough.
Adjust Nozzle Temperature
The nozzle temperature is important for the filament flowing rate. In this case, please check the nozzle temperature match to the filament. If the extrusion is not smooth, then gradually increase the nozzle temperature until it flows smoothly.
CLEAN YOUR NOZZLE
Make sure the nozzle is clean. Even the slightest residuum or nozzle jam can affect the printing quality.
USE QUALITY FILAMENT
Choose high quality filament which can make sure the extrusion is smooth. Although the cheap filament might look the same, but the difference can be shown on the prints.
Unlevel Print Bed
When printing at high resolution, the smallest level of error such as unlevel print bed will have an impact throughout the printing process and it will show in the details.
CHECK PLATFORM LEVEL
Manual leveling the print bed or use the automatic leveling function if have. When manually leveling, move the nozzle clockwise or counterclockwise to the four corners of the print bed, and make the distance between the nozzle and the print bed about 0.1mm. Similarly, printing paper can be used for assistance.
Printer Losing Alignment
When the printer is working, any excessive friction of the screw or belt will cause the shaft moves not properly and make the print looks not so nice.
MAINTAIN YOUR PRINTER
As long as the screw or belt of the printer is slightly misaligned or loose, causing any additional friction, it will reduce the print quality. Therefore, it is necessary to check and maintain the printer regularly to ensure that the screw is aligned, the belt is not loose, and the shaft moves smoothly.
Detail Features too small
If the details are too small to be described by the extruded filament, that means these details are difficult to print.
Enable the special mode
Some slicing software has special features modes for very thin walls and external features, such as Simplify 3D. You can try to print the small features by enable this function. Click “Edit Process Settings” in Simplify3D, enter the “Advanced” tab, and then change “External Thin Wall Type” to “Allow single extrusion walls”. After saving these settings, open the preview and you will see the thin walls under this special single extrusion.
Redesign the detail part
If the issue still couldn’t be solved, another option is to redesign the part to be larger than the nozzle diameter. But this usually involves making changes in the original CAD file. After changing, re-import the slicing software for slicing and retry printing the small features.
Post time: Jan-06-2021